
So far, I’ve yet to make a satellite contact using the FM repeaters available. Seems I’m either not fast enough, the repeater is down, or my equipment isn’t right. There’s always SOMETHING that works against me!
EDIT: Finally made a contact on Oct 8, 2020 on SO-50! Sample audio in the article below!
So, why do this to myself? I’m a nut job, that’s why! Or maybe I just have to prove something to myself. I mean think about it… you’re sending a signal to an object in orbit, flying at some 27,000 km (16,777 miles) an hour, and 400-800 km (250-500 miles) above the earth. You’re standing there, pointing a measly 5w radio at it, hoping to make a contact with someone else pointing their stick at the bird as well. The cool thing is, if you make the contact, you can do so with someone 3,000 km (1,800 miles) away as measured by the path of the signal! How’s that for efficiency? Never mind the coolness factor that your signal went to space and back!
Ok, do I have you interested yet? If not, you have no adventure in your life. You make me sad.
If you ARE interested, here are some links and my own lessons learned that may help you along.
What is there to do?
As far as satellites go, there are all kinds of signals to receive, and some you can send. Here’s the short list.
Receive Only
- Weather Satellites
- ISS Special Events
- Telemetry Data
Send and Receive
- FM Repeater
- SSB Repeater
- APRS
Receiving is certainly easier, and can be done (with a little luck) with a simple HT and a decent rubber duckie antenna. For a little more effort one can construct (or purchase) a directional antenna such as referenced in the lings at the bottom of this article.
Where Do I Start?
Equipment! Got to get some new snazzy do-hickies right? Well, we don’t need to go crazy here. For receive only of FM mode satellites, a simple dual band HT (even a Btech/Baofeng) will work. If you want to transmit, you have two options; the radio must have the ability to do split transmit/receive operations (again, the Bs work here), or use two radios. There are pros/cons for each way, but we’ll get into that later.
The antenna for receiving is a “it depends”. If you want to just hear some stuff, the rubber duck antenna may work, depending on the path of the satellite. The evening of this writing, I was able to use an aftermarket Diamond antenna on my FT-60 to hear the NOAA-19, and it was only 26 degrees off the horizon.
If you want to hear well, or be able to decode signals well, I recommend a directional antenna with some forward to rear gain like a yagi. You can build it yourself, or order one pre-made, but just make sure that it’s made for the band(s) you are needing to hear and/or transmit on. Most satellites for the ham radio bands are using some combination of 70cm/2m for operations, so pick your antenna understanding what frequencies you’ll be using.
Now you’re ready! Where ‘dem birds?!
We’ll need to know some information. What satellite are we wanting to hear, what frequency/modes does it support, and where in the world am I?
Let’s start with where you are. If you have a handy smart phone, you can simply download an app that lets you know where you are, and what satellites are going to fly over in the next few days. If you don’t have that, you’ll have to use an online app, or something you download to your computer for use. See links below for software. So, you’ll want to look for a satellite that matches the mode (FM, digital, SSB, etc) and frequency you can support with your equipment.
Example Setup and Execution
I have a Btech UV-5R that will allow me to do 2 meter and 70 centimeter FM communication. I have an Arrow II Satellite antenna, with a built in duplexer, so I can listen and transmit using a single coax on the antenna. I have a BNC coax from the antenna, and the appropriate BNC to SMA adapter for the Btech radio so I can connect them correctly.
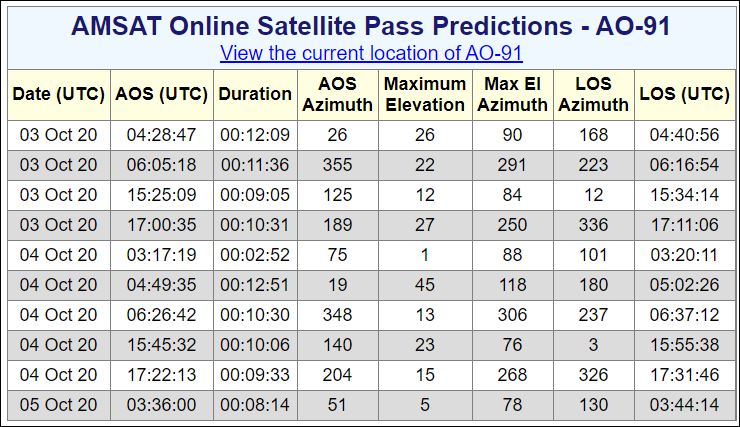
I don’t have a phone, but I know I’m in grid square EM97 according to https://www.levinecentral.com/ham/grid_square.php. I’ve selected AO-91 as my target (summary of FM satellites here). I want to use the repeater on AO-91, so I need to collect the next 10 passes on AMSAT Predictions to see which ones I want to try to work. There, I enter my information, and click “Predict”, and get presented with the below information.
Now, I need some understanding of the frequencies, doppler effect, and how to program my HT.
For repeater satellites, there are two frequencies I’m interested in; Uplink, and Downlink. These designators are from the user’s perspective, so you want to listen to the satellite by using what is coming “Down”, and send “Up” your transmissions. For AO-91 that means we have a downlink FM frequency of 145.960 MHz, and an uplink frequency of 435.250 MHz. This is also just like terrestrial repeaters in that it makes use of a tone to open the repeater. That tone is 67 Hz (CTCSS), and needs to be enabled for transmit.
Now comes some complication… remember how that satellite is moving, FAST? Since it’s moving, and you’re stationary, as it comes toward you, the frequency will change! So receiving will need to be INCREASED in frequency as it comes toward you, ON frequency as it is above you, and DECREASED as it runs away. Transmitting is just the opposite. TX requires DECREASE as it comes toward you, and INCREASE as it goes away.
This is also relevant to the frequency. The higher the frequency, the more impact that doppler will have. For 800 km orbit satellites, this works out to be a maximum of +/- 3kHz at VHF frequencies and +/- 9kHz at UHF frequencies. If you want the details on this, check out this link. How do you know what to use and when to use it? Well, VHF looks like you can leave alone, but UHF frequencies will need to be adjusted. You just have to get a feel for it. If you listen and it has white noise, it can either be the signal strength (not pointing correctly at the satellite) or doppler effect in need of a frequency change. The amount of change is relevant to the pass, your position, and how you hold your tongue as you concentrate.
How do you keep all this straight? Here’s my method. I use 5 memory channels for any given satellite. I name the channels (in this case) as shown below with these frequencies.
| Channel Name | Downlink (listen) Freq MHz | Uplink (transmit) Freq MHz | Tone Hz (CTCSS) |
| AO91+2 | 145.960 | 435.240 | 67 |
| AO91+1 | 145.960 | 435.245 | 67 |
| AO91 | 145.960 | 435.250 | 67 |
| AO91-1 | 145.960 | 435.255 | 67 |
| AO91-2 | 145.960 | 435.260 | 67 |
(Using CHIRP? Import this .CSV file for all the satellites I know of and make it easy on yourself!)
I would highly suggest you use CHIRP to program these frequencies as split operations are a real pain to program from the radio directly.
Now we have the radio, programming done, antenna, and schedule. What now?
OH! The compass and direction of the pass!
Looking at the chart above, we want to give ourselves the best chance at using the satellite, so we look for the highest elevation the pass will achieve. The highest pass on the chart is 04 Oct 20 at 04:49:35 UTC (yes, UTC time, so make sure you translate that correctly into your own timezone/daylight savings). The maximum elevation is 45 degrees. Since we’re doing this manually (no easy cell phone tricks) we need to pay attention to three azimuths. Acquisition of signal (AOS) azimuth, Maximum elevation (Max El) azimuth, and loss of signal (LOS) azimuth. Using these values, I recommend picking out a spot in the yard where you can get a rough visualization of the path of the satellite at least 15 minutes ahead of the pass.
Get out your compass, and orient it due north (so the zero is aligned with the compass needle in it’s north position). The AOS azimuth is 19, so orient your body as if you were standing in the middle of the compass, and point your finger at the horizon toward (what would be) the 19th degree. That is where the satellite should start (not going into hills/mountains/buildings/etc., just assume we’re on flat ground). Now, orient your pointer finger (and body) to the 118th degree, and point up at 45 degrees (tip, your fist at arms length covers approximately 10 degrees, so, 4 and 1/2 fists). That is where it will be at the top of the pass. Now keep moving around and point at the LOS position on the horizon at the 180th degree mark. That is where the path will end. If you were paying attention, you’ll notice that you just made an arc in the sky that resembles the path by which the satellite will pass. Now, how fast will it go? If you look at the chart, the “Duration” shows us the pass will take almost 13 minutes. So from the start, it should take 6 1/2 minutes to reach the 118 degree “Max El”, and another 6 1/2 minutes to get to the LOS position. Pretty cool huh? Now, practice that arc, and ensure there are no large objects in the way. If there are obstacles, you may want to reconsider your location.
Now for the main event! We have our pass information, we’ve mapped out the pass, programmed the radio, charged the batteries, connected everything, and have been working out our antenna arm so we won’t get a cramp while holding that antenna for 13 minutes.
Set the radio channel to “AO91+1” (may not have to go all the way to “AO91+2”), and set your squelch to 0. Yes, you have to listen to a LOT of static. Just deal with it. Start pointing the antenna about a minute before AOS. Even though you can’t “see” the satellite, the signals may be bending around in the atmosphere. You hear the voices? Here it comes! Start moving the antenna around a bit. Listen for clearer signals as you point and twist the antenna to account for any polarization effects. Polarization? Basically there’s a dipole on the satellite, and you have to align your antenna in the same orientation to get the best signal. Oh, and did I mention that the satellite spins a bit, so this will change as the pass progresses? Having fun yet?!
Here is a sample of what you can expect to hear:
If you listen at about the 6:38 mark, you can hear the last bit of my CQ where I state my grid square “EM97”. That’s all I could get in for that pass.
The typical exchange is callsign and first 4 of your grid square location. Some abbreviations are heard for callsigns on the reply, or just referencing the other contact’s grid square. As you can hear, this is a fast paced soup of information. I recommend doing an audio recording of the session so you can go back later and recount the callsigns rather than recording on paper during the event.
As more white noise in introduced, don’t forget, it may be because you need to alter the frequency. As the satellite gets close to the top of the pass, switch to the middle channel “AO91”, then to “AO91-1” as it goes down. Only change frequencies when you get the white noise, and it’s not correctable by antenna orientation/direction.
Hear an opening? Get in there!!! Callsign/Grid!!! Anyone calling you back? Make a call to that guy with “UFO” in his callsign! Don’t be shy, but don’t muddy up the other contacts either. It’s a balance, one that I’ve yet to work through.
Did you get a contact?!?! Congrats! Look ’em up on QRZ and send a QSL card. Send me an email and let me know about it!
Didn’t get a contact? There’s another pass coming, so remember what you did, learn from it, and keep trying!
Other Things to Try
One of my favorite things to do is capture the Slow Scan TV (SSTV) images from the International Space Station. Occasionally they will recognize astronauts and engineering in the form of images that I liken to stamps. Much like stamps, I like to collect them as the ISS passes over during these time periods. Watch websites such as this one for details and schedule updates.
Here’s one I captured as the ISS was just coming up into view (so I missed the top part of the image).
All I did for this pass was record the audio to an MP3 player, then processed the audio through MMSSTV on my computer later.
Can’t this be easier?
Of course it can. How much do you like to build or buy? You can build or buy your own antenna rotator to free your arm. It can even be controlled by your computer!
How about this setup from Jerry (K4WOF) as seen here!
You can also use software to automatically tune your radio to compensate for doppler effect such as seen in this youtube video.
Conclusion
Satellite communications brings even more capability, learning, and skill building to an already diverse hobby. This is a small sample of what one can do with satellites and is presented as a stepping stone for a possible new adventure. Using satellites to communicate or simply receive information presents new challenges and opportunities for exploring the amateur radio hobby where the sky is NOT the limit!
Links
Antennas
Software
- AMSAT Online Satellite Pass Predictions
- Grid Square Locator Map
- PC/Mac Software (pay for and open source)
- ISS Detector (Android) (iPhone)
- CHIRP
- MMSSTV
Hardware
Resources
- Amateur Radio in Space – AMSAT
- AMSAT-UK
- Amateur Radio on the International Space Station
- Station and Operating Hints
- ISS SSTV Schedule updates
- More about ISS SSTV
- How to Work FM Satellites