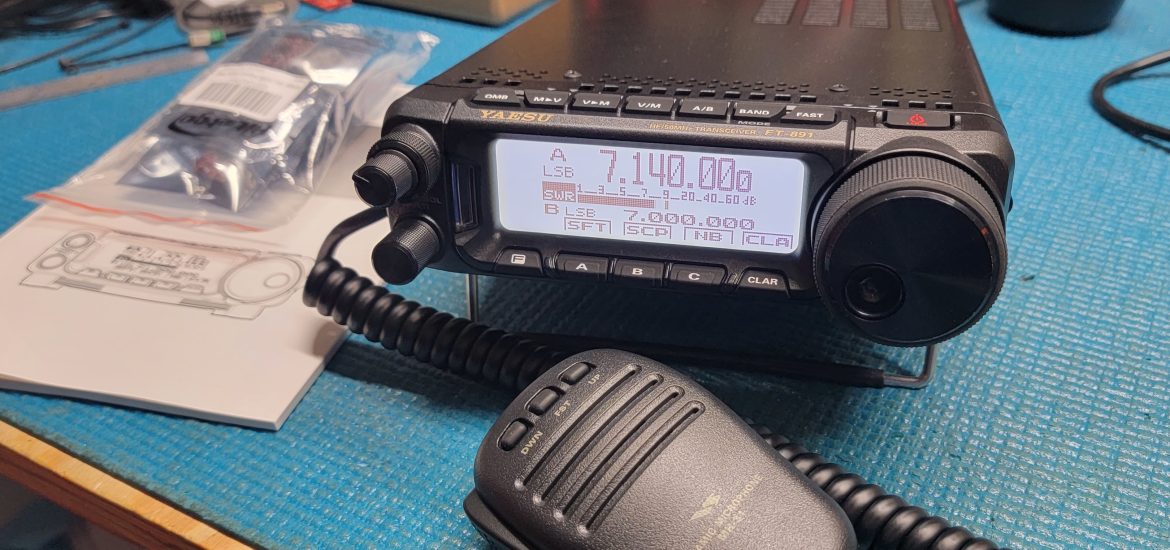
If you’re new to the Yaesu FT-891, you may find some things a bit odd, or difficult to use. If you’re a new ham on top of that, it can be quite frustrating. Here, I will attempt to capture some of the points of the FT-891 that are often missed or overlooked by the operator, as well as some workarounds for things that should have worked in the first place.
This post will be updated as I have more information to share as my adventures continue with this radio. I’m also going to try to send you to the manual for things that are already there, so keep it handy.
Things You Should Do Right Out of the Box
Familiarize yourself with the Yaesu FT-891 product page (link), and go to the “Files” tab. There you will find lots of things that you will need. Let’s do a rundown of things you need, and what they are.
Manuals
Manuals (yes, plural) you need to download now (you can use my links, but better to go to the product page and download the newest available version):
- FT-891 Operating Manual – Same as the printed one in your box
- FT-891 Advance Manual (1806-F) – The “rest” of the manual that you will need
While we’re on the subject of manuals, I highly recommend purchasing a Nifty manual (link) for any radio you’ll take to the field.
Interfacing with a computer?
Software/Manuals you need to download now:
- SCU-17 USB Interface Unit Instruction Manual rev. 2018 – Instructions to install the USB driver software – follow directions before plugging radio to computer
- FT-891 USB Driver Virtual COM Port Driver (Windows 11/10) – Zipped version of the USB driver software
Walk Around the Interface
People often complain about the Yaesu menu systems, but I don’t know of an alternative when you have something so compact. If you use it for any length of time, you’ll figure things out. Anything you need to get to in a hurry can be added to the function buttons, so you can customize the interface to meet your operational needs.
The display screen has 3 modes. Get to know them, and how to get into and out of them.
- Main – Basically exited from any of the function menus
- Settings Mode – Short presses of [F] key cycle through setting screens, exit with short [A], [B], or [C] key, or long press [F].
- Menu Mode – Long press of [F] key to get in, short [F], [A], [B], or [C] to exit.
Customize the Function Buttons
Need to continually change a setting? The [A], [B], [C] buttons on the front of the radio are customizable. You can assign whatever Settings Mode selection you wish to those buttons. You do this by going into the Settings Mode, using the multifunction knob to point to the setting you want, and long pressing the [A], [B], or [C] button. You will then see that setting displayed above the button.
Initial Setup for Phone
The FT-891 sounds fine with the stock microphone and the default settings. The switch on the back of the microphone is for (1) full range ragchew setting, and (2) “punchy” for better DX.
But, there is a hidden gem within this radio. It’s the YAESU Parametric EQ settings available in the TX Audio options in the menu mode. Use the following menu settings as a starting point. Remember to enable the Parametric EQ in the Settings Mode, FUNCTION-2, MEQ. Select with the multifunction knob, and push to highlight MEQ to engage. I get unsolicited “great audio” reports all the time.
Heil Recommendations for the Parametric EQ
| Menu Number | Name | Default | New Value |
| 15-10 | P-EQ1 FREQ | 200 | 200 |
| 15-11 | P-EQ1 LEVEL | 0 | -3 |
| 15-12 | P-EQ1 BWTH | 2 | 2 |
| 15-13 | P-EQ2 FREQ | 800 | 900 |
| 15-14 | P-EQ2 LEVEL | 0 | -3 |
| 15-15 | P-EQ2 BWTH | 1 | 2 |
| 15-16 | P-EQ3 FREQ | 2100 | 2500 |
| 15-17 | P-EQ3 LEVEL | 0 | +8 |
| 15-18 | P-EQ3 BWTH | 1 | 2 |
Voice Keyer
If you want to make use of the internal voice keyer to save your voice during those POTA activations, you first have to enable the Settings Mode for REC SETTING. This is done through the menu settings.
Menu 05-11 REC SETTING - Set to ENABLE
You can then access the Settings Mode REC SETTING to record and playback your messages.
To record a message, access the Settings Mode REC SETTING, use the multi-knob to select MEM, then use again to select the CH# you want to record to. To begin recording, use the microphone PTT. To stop the recording, push the multi-knob. It takes some getting used to, but you’ll get the hang of it.
To play the message, use the multi-knob to select the CH#, then push the multi-knob.
To transmit the message, highlight the PB option, then select the CH# to play.
Playback audio level as heard by you are available in menu setting below.
Menu 03-01 DVS RX OUT LEVEL - Change to suit
Understand the Power Settings
Menu items for power are under the TX GNRL section, items 16-01 thru 16-06. You must know what power setting to manipulate for the given mode/frequency you wish to change.
| Menu Number | Name | Purpose |
| 16-01 | HF SSB PWR | HF SSB mode maximum power |
| 16-02 | HF AM PWR | HF AM mode maximum power |
| 16-03 | HF PWR | HF CW, Data, and FM mode maximum power |
| 16-04 | 50M SSB PWR | 50 MHz SSB mode maximum power |
| 16-05 | 50M AM PWR | 50 MHz AM mode maximum power |
| 16-06 | 50M PWR | 50 MHz CW, Data, and FM mode maximum power |
External Tuner Cycle Hack
I mainly do phone, but CW mode is quite handy to tune my external tuner. The great thing about this radio is that the power settings for CW are separate from SSB, and if you connect a morse key to the back “key” port, any time you close the contacts, it goes into CW mode and uses those settings.
My hack is to always keep a momentary-on pushbutton contact connected to the “key” port, and CW power set to 10 watts for tuning cycles. All I have to do is touch my tuner “tune” button, then hold the pushbutton switch until the tuning cycle completes. If the pushbutton doesn’t transmit, check the Settings Mode, CW SETTING, and engage the BK-IN function.
Menu 04-01 KEYER TYPE - set to "OFF" for straight key operation
Menu 16-03 HF PWR - set to 10 watts
Menu 16-06 50M PWR - set to 10 watts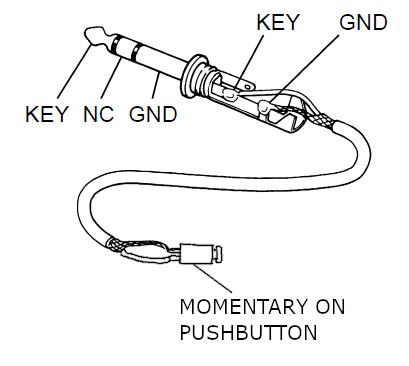
Spectrum Scope
The Spectrum Scope is a great tool added into the FT-891, and works for what it was intended. It’s not an ongoing display, constantly showing the history of the band segment. It is a snapshot of a quick scan of the segment of the band. Get to know how to use it, and it’s very useful in the field. I assign my [B] function key to SCP so it’s always available to help find a clear spot to start calling CQ.
Start the spectrum scope by accessing the Settings Menu, FUNCTION-2, and selecting SCP. Long press the [F] button to exit the Settings Menu, and you should now see the spectrum scope. Remember, this was a snapshot, so if you want to refresh, press the function button below SWP (sweep). To increase or decrease the bandwidth you are viewing, cycle the selections using the SPN (span) button. To increase or decrease the sensitivity of the display, press the LV# (level) button. Play around with this, move up and down the band while viewing the scope and understand what it does. I find that it’s just enough information for me to work in the field. Exit the scope by short pressing the [F] button.
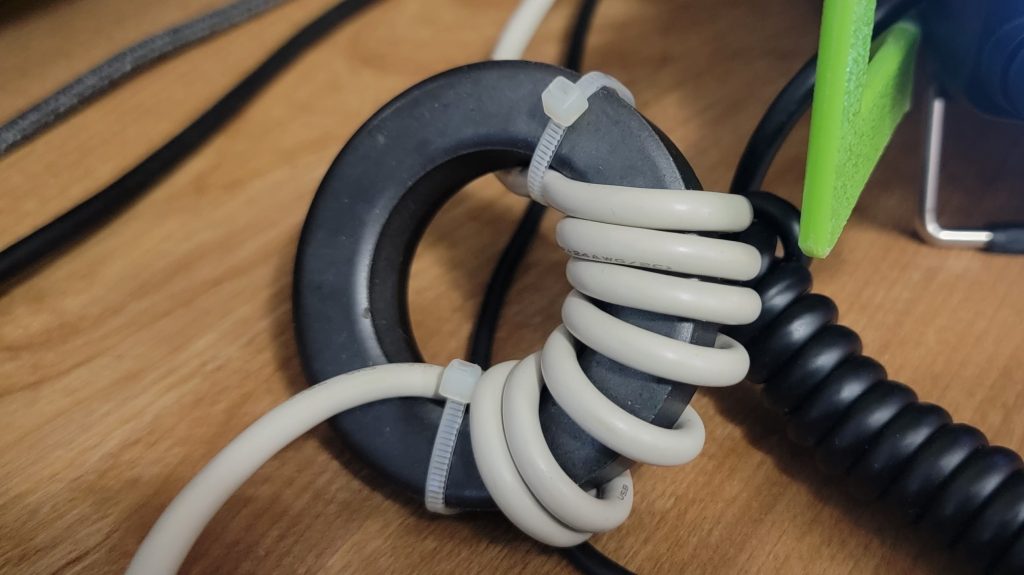
Problems with Mouse/Keyboard During Transmit
Can’t do stuff on the computer while transmitting? This is normally due to RF getting into the computer. I wrap my USB cable through a toroid a few times, and/or reposition the radio and cabling relative to the computer. That normally helps it. If that doesn’t help, there are USB isolators available that could help (link), but I’ve never used one, and I mainly use an EFHW antenna (link) in the field.
Operating Voltage and Battery Usage
The operating voltage should be maintained between 11.73 volts and 15.87 volts. Otherwise the radio could be damaged. Note that SLED batteries can drop below the required 11.73 volts during the operating cycle of the battery, so I only use LiFePO4 batteries to maintain a higher voltage for more of the operating voltage range of the battery. My favorite value battery at this time is the Miady LFP16AH 12V 20Ah Deep Cycle LiFePO4 (link). I also recommend using a Power Analyzer such as this one (link) while operating off of a battery. It gives indication of the voltage as you are transmitting, so it’s much easier to monitor the level.
Viewing the battery voltage as seen from the radio is only displayed briefly in the lower right corner of the display as the radio is turned on. I really wish it were displayed on the screen all the time.
FT8 Setup – Windows OS
While there are certainly other ways to do this, I’m going to give you the way that works best for me. I like to make use of the Data mode and simple sound cards available as USB devices (link).
For this setup, I’m going to assume you have Windows skills to install WSJT-X, know how to use device manager to view connected devices, and know how to find your microphone and phone volume settings.
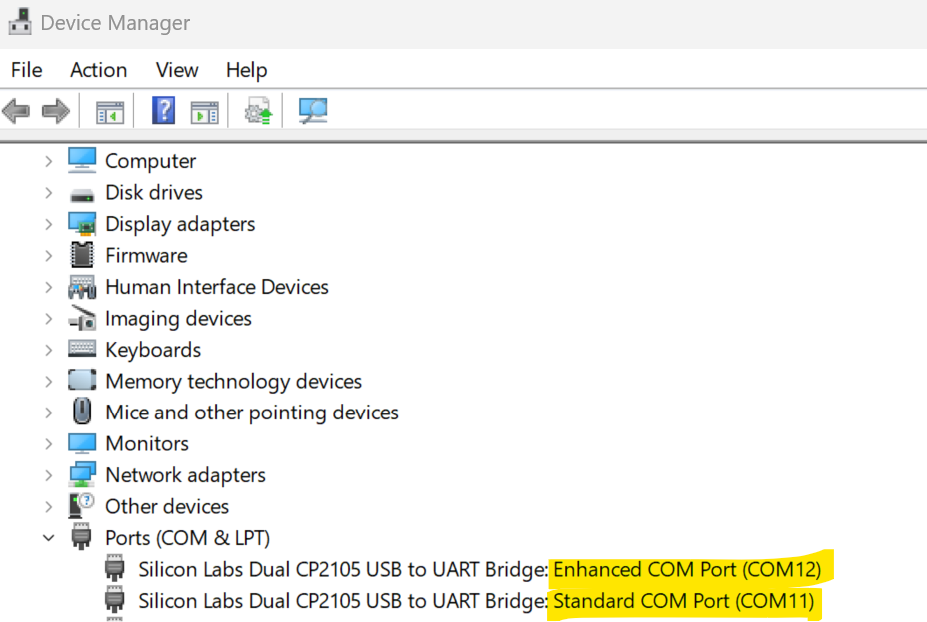
Follow the Yaesu manual covering the computer USB connection driver installation/setup first (SCU-17 USB Interface Unit Instruction Manual rev. 2018 listed above). This will give you two COM ports to use when connected to the radio. They have two different purposes, so learn which one you need to point to in any controlling software you’ll use.
- Enhanced COM Port – Frequency and Communication Mode
- Standard COM Port – PTT Control, CW Keying, Digital Mode Operation
Once the drivers are installed and the radio is powered on and connected via USB, you should see something similar to this in Device Manager on the computer (note the highlight):
Then, we will route the audio to and from the radio via custom cables, or ones you can get from vendors. Here is one such cable (eBay Link). It even makes optional use of the TRRS type port used in a lot of the newer laptops (like mine).
The basic connection required is below:
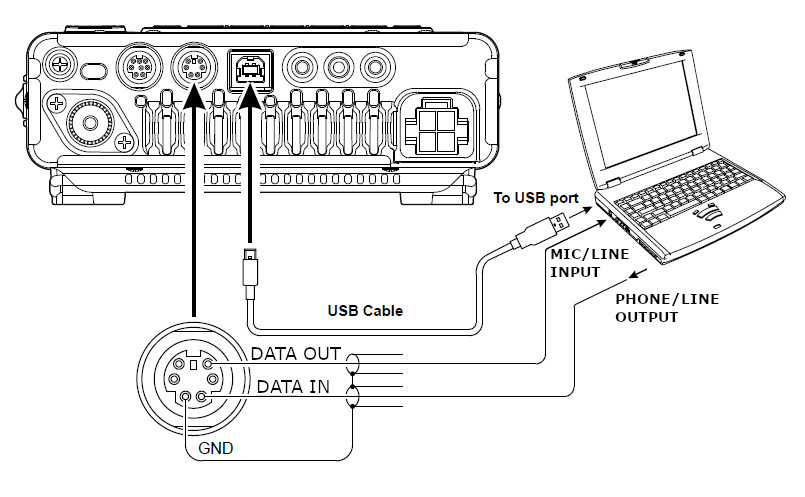
With this setup, we will use the computer sound card (or USB sound card) for the audio in and out of the computer, connected to the radio via the RTTY/DATA port. We will use the USB connection to the radio to initialize the PTT during transmit, and to let the software know what frequency the radio is on.
The relevant menu settings to use the DATA mode for FT8 are shown below Anything not listed are assumed to already be set to the factory default.
Menu 05-06 CAT RATE - Set to 4800bps (default)
Menu 05-07 CAT TOT - Set to 1000msec (sometimes we need to wait)
Menu 05-08 CAT RTS - Set to ENABLE (default enabled)
Menu 08-01 DATA MODE - Set to OTHERS
Menu 08-03 OTHER DISP - Set to 1500Hz (RX BFO frequency required by FT8)
Menu 08-04 OTHER SHIFT - Set to 1500Hz (Transmit BFO frequency required by FT8)
Menu 08-09 DATA IN SELECT - Set to REAR (default)
Menu 08-10 DATA PTT SELECT - Set to RTS (allows USB COM port RTS to transmit)
Menu 08-12 DATA BFO - Set to USB (all FT8 use USB regardless of band)
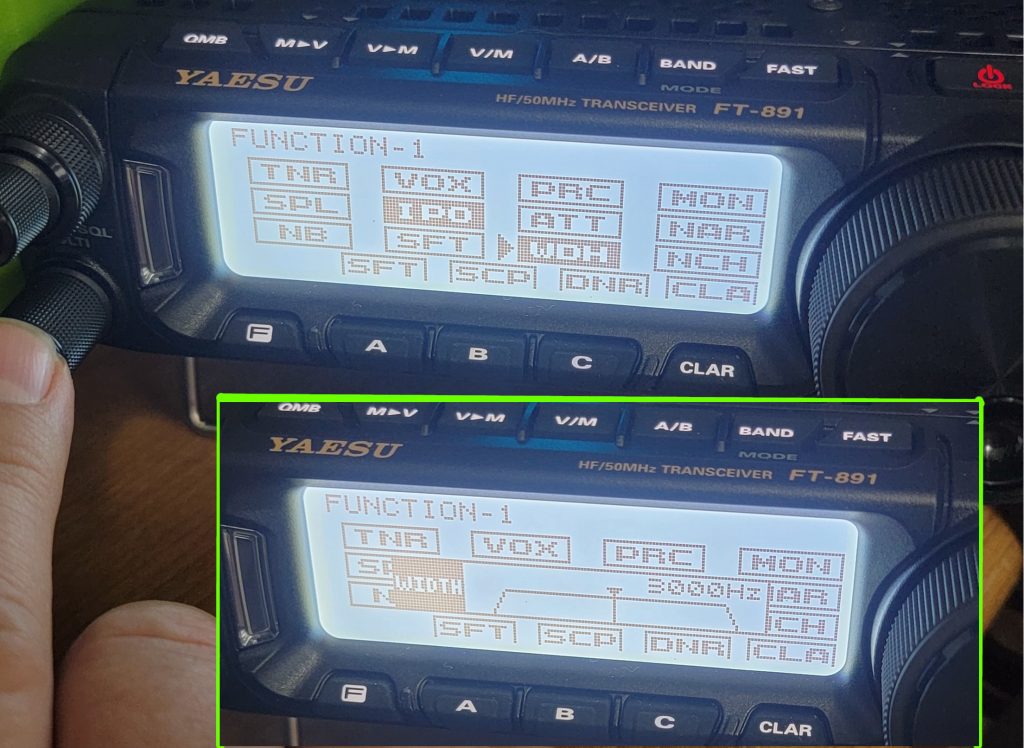
Menu 16-03 (HF) or 16-05 (50MHz) - Set power to 40 watts or lower (no need to go higher)Once you engage Data mode, go to Settings Mode, Function-1 screen, engage the WDH setting (Receiving Bandwidth), and increase to 3000Hz. It’s annoying that the radio doesn’t remember the previous setting, but you have to do this every time you power cycle the radio. However, it’s easier than changing all those other settings to use SSB for FT8!
Now, sync your computer clock before you continue. You should make that a habit before any FT8 session.
Start up WSJT-X. Make sure it is in FT8 mode by going to Mode… FT8. Now, Go to File… Settings.
Update anything you need to in the General Tab for your callsign/grid/etc.
Go to the Radio tab. Select Yaesu FT-891 for the Rig. Under CAT Control, set the Serial Port to the COM number of the Enhanced COM Port number you read in device manager. Set the baud rate to the same value as you set Menu 05-06 to (4800). Data Bits – Default, Stop Bits – Default, Handshake – Default. Force Control Lines should show blanks for DTR and RTS.
PTT Method should be set to RTS, and the Port changed to the COM port for the Standard COM port in device manager.
Transmit Audio Source should be greyed out. Mode set to Data/Pkt. Split Operation set to None.
Now, click the Test CAT button. After a short delay, it should turn dark green.
Click the Test PTT button. Your radio should go into transmit mode. Click the button again to stop transmitting.
If these tests did not work, go back and re-check your settings in the radio and software interface.
If the tests were successful, click the OK to save.
Now, go back into File… Settings, and go to the Audio tab. Make sure that the correct soundcard input and outputs are selected. Click OK to save/close the window.
Now, using the WSJT-X interface, select the band you wish to operate in the lower left of the screen. It’s a dropdown box left of the frequency readout. Once you change the band, your radio should jump to that frequency. If that didn’t work, you haven’t been playing along. Go back… you missed something.
We now need to set the audio levels. Starting at the radio, rotate the RF/SQL knob (ring around the volume) to the right a few times. This gives maximum gain to the signal coming in. We don’t need to manage that with the radio as we’ll be managing via the computer.
Turn the radio volume knob down to a comfortable level for you. I barely want to hear what’s going on. I like to hear it just as an indicator of what’s going on.
Now, go to WSJT-X and verify that signal levels coming in are being heard, and at a level that the software can use. This is shown by the audio level indicator at the bottom left of the screen. The audio level is indicated by a vertical bar. You want the signal at most to be at 80%, lowest around 30%. Adjust your computer microphone level (for the soundcard you are using) until you achieve the audio level needed.
We will now work on your transmit audio level. First, we need the radio to display the ALC level during transmit. This is done by going to the Settings Mode, FUNCTION-2 screen, and selecting MTR (meter). You then select ALC from the available options. Exit the Settings Mode, and you will now see an “ALC” indicator below the frequency. During transmit, the meter will increase from the left towards a visual “bump” just above the signal indicator. If you are beyond the “bump”, you have too much audio signal.
The goal now is to have the computer send an audio signal level to the radio that will keep the radio ALC from engaging. This is done by using the Tune feature in WSJT-X in the lower right quadrant of the interface. During Tune, the software sends a tone through the soundcard to the radio, and engages the PTT to transmit. The audio level output can be manipulated in two ways: by using the WSJT-X software by sliding the right bar up and down, or using your computer soundcard volume level. During transmit, watch the ALC indicator on the radio. Adjust the audio level until the bar is just left of the visual “bump”. Now you can toggle the tune button to stop transmitting.
You should now be ready to use FT8 with your FT-891. If you don’t know how to run FT8, there are plenty of online sources to walk you through the mode. Start with the WSJT-X guide (link), and YouTube (link).
Conclusion and Thoughts
While there are definitely things I’d like to work differently on the Yaesu FT-891, I certainly have enjoyed it’s operation. The price to performance is outstanding for this model, and it works great for it’s intended purpose. It is a great, compact, 100W transceiver with a very visible display. The voice keyer feature is now a requirement for any future radio purchase considerations.
Most issues that people list as problems can be worked around with tools or updating your operating skills with operation time. Integration with a computer works very well, but it would have been nicer if the audio could have been included to reduce the cable complexity.
The lack of an internal tuner isn’t an issue for me as I include an external tuner (link) in my kit, and often use resonant antennas anyways.
I would recommend this radio for anyone on a budget, or wanting something robust for the field that is 100 watts capable as long as they are willing to work with the radio to learn it’s operation. If you are expecting to work it in a contest right out of the box, this is not the radio for you. Go get something twice the price.
73!